


The Roller Aerial Monopod
Jun 2, 2008
Udi Tirosh
Udi Tirosh is an entrepreneur, photography inventor, journalist, educator, and writer based in Israel. With over 25 years of experience in the photo-video industry, Udi has built and sold several photography-related brands. Udi has a double degree in mass media communications and computer science.
Share:
 The following tutorial on building an Ariel Monopod is a guest post by Adam Hajnos.
Recently I was carrying around my camera and tripod at a music festival when I got the idea to do an aerial shot. I extended the tripod out all the way and put the camera on a timer. Only problem is, my tripod weighs upwards of 50lbs. So here is a simple solution to make a lightweight, portable monopod for “aerial” photography.
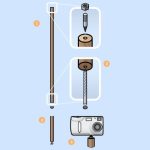
Here’s what you’ll need to get started. I got everything for around $15. But the most expensive part was the roller. Home Depot has a 30 Foot pole for $40 which I may get someday. But for now I went with an 8 footer (see: 6 Foot, Mega 16 Foot).

If you don’t have a tripod head, you can just use a 1/4″ Hangar Bolt and screw in directly to the camera.

Here’s what the end on the paint roller extension rod looks like. It’s a 3/4″ bolt. We need it to fit a 3/8″ bolt.


The bolt is 3″ long, and we need it to stick out 0.5″. So I put the bolt next to the wooden extension and measures half an inch below the bolt.

Once you cut the wood, it should be about 4 inches tall. Next we need to find the center of the wood.


I just eyeballed the center, I drew two straight lines and marked where they met. Next, we need to drill out a hole that is 3/8″ wide so we can put our hanger bolt in the wood. Clamp down the shaft and begin to SLOWLY drill out the wood. Make sure you keep your drill level so you don’t poke thru the sides.


Insert the sharp end on the hangar bolt (one side is for wood, the other has a tighter thread for metal) Grab the sides of the bolt and twist until there is only 0.5″ sticking out. Be careful not to mess up the threads with the pliers. I tried to only grab the threads down low, since they would not be used. Once you are done, glue your washer on the end (optional).


Here it is with the tripod head attached.

And the final product, fully extended (no camera on top, of course).


Here’s a shot, with my fish eye lens about 9ft up in the air. I also made the paint roller extension rod with a strap – you can view that tutorial here.
So, how do you trigger the camera? There are two options here: you can either use the built in timer function (like the picture taken above), or you can use an infra red remote.
Side Note 1 – this will work with ANY paint roller extender. I wonder what’s the biggest one they have
Side Note 2 – While you are completely free to use this monopod with any camera you want – make sure it is tight and fastened before you mount a Nikon D3 or a Canon 1DS MK3 on the ball head.
Side Note 3 – The higher you go, the harder is it to control the frame. I suggest using very wide lenses.
This is also a good opportunity to remind you all that the At My Home Photo Contest is still running on the next two weeks. We’ve got some great submissions – you can see them here.
Here Are Some More Tripod Ideas:
– Cheap Mini Monopod
– The Super-Small Bottle-Cap Tripod
– Just a Washer And a Bolt – An Ingenious Camera Stabilizer
– The DIY Magic Arm
– The DIY Gorilla Pod

Udi Tirosh
Udi Tirosh is an entrepreneur, photography inventor, journalist, educator, and writer based in Israel. With over 25 years of experience in the photo-video industry, Udi has built and sold several photography-related brands. Udi has a double degree in mass media communications and computer science.


Join the Discussion
DIYP Comment Policy
Be nice, be on-topic, no personal information or flames.