The DIY Light Table - A Weekend Project

(o14)Here's a great project for a weekend. The DIY Light Table, courtesy of Félix Ménard (Flickr).

The idea behind the light table is simple. Things look really great if the light is passing through them. As opposed to light being reflected off them. This is why slides look so good, this is why we love vitrage windows in churches. 

A light table is the perfect way to inspect slides, negs and to do some really interesting art.

This project by Felix uses an old desktop (from when desktops were actually made from wood and did not have any chips in them), however, a similar project can be made with more temporary means which are great for a weekend project. I'll discuss this towards the end.

Felix Never-Break-Really-Permanent Light Table

Let's see how Felix approached the light table project, materials first:

  • Table or desk ($15) Found at the local eco-centre (a user-friendly dump) - That two points for environment friendliness right there.
  • White piece of plastic to diffuse the light ($12). Plexi is very
    expensive so I've cut a part of these opaque white diffuser for ceiling
    fluorescent tube.
  • Glass (7$)
  • Fluorescent lights (2x $10)
  • Extension cord ($1)
  • Thin foil, tape, glue, screws, electrical switch, etc (few dollars)

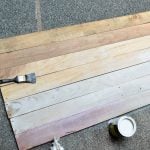
Here is how you go about building the table. Now those instructions are for a real table. I'll switch to quick and dirty hacks in the end.

First thing, mark the size of the hole you'd like to cut from the table. It should be as big as you can without going outside of the underlying box.

The DIY Light Table - A Weekend Project

Next step is cutting the board. This is, as Felix mentioned really easy if you have the right tools. You can take the board of the hinges to make it easier. Once the table top is cut, install it back.

The DIY Photography Light Table - A Weekend Project

We're almost there. Now glue some tinfoil on the internals of the box. The tinfoil really helps to get the diffusion right and avoid any hotspots. Another more permanent, yet time consuming, option is to spray paint the internal with silver paint.

Last step is to install the fluorescent lights. The best options is to place the lights in parallel, pointing to the sides of the box in opposite directions. (You can use more lights if you want to, this will give your table the option to double as a softbox as well)

The DIY Photography Light Table - A Weekend Project

This is how the final product looks like.

And this is how it looks like when it is used to examine slides (yea, those square things that used to capture excellent quality images. And don't tell me that digital can do it better... OK, you can tell, just don't start a film Vs. Neg flame)

The DIY Photography Light Table - A Weekend Project

How To Make It Portable, Sofboxy And Flashy 

OK, the Desktop Light really rocks, however, here are some ideas that play on the theme.

Make It Portable - Felix used a desk which made his construction a full-fledged light table. There are other options, though - use a wine crate instead of an old desk and you - A. Don't need to cut anything and B. Can move it easily from location to location. You don't even have to glue the plastic on. Don't have a wine crate? Good! Simply use the cardboard box you were going to throw away.

Make It Double As A Softbox - yes, that's right. If it is portable and have enough power it can be used as a soft box. Simply turn the box on its side and you have an instant softbox. How to get more power, you ask. Use more fluorescents. 

Use Flash For Lighting - you can use one or more small flashes to light the table. A similar setup using transparent glass was the base for the infamous Corona shot. This of course will not help you browse your slides, but it can surely kick on the next section:

What's With The Pacman Thing?

The DIY Photography Light Table - A Weekend ProjectOK, the Packman thing is what happens when you light through thin slices of fruit. The light going through the fruit reveal its texture.

The same effect is shown on the left in a peppermint leaf image made by Ciro Boro

While taking such image may look easy it hides a few challenges. On the camera side, you'll have to deal with flare coming from the relatively huge surface that is being lit. The best option to manage this flare is to block all non relevant parts on that table with black paper or cardboard (read more on the best photography book ever - Light, Science and Magic, chapter 7)

On the fruit side you have to cut the fruit thin. It is easier to cut a fruit when it is hard - use hard, not very ripe fruits. A super sharp chef's knife will also help. Don't mind the price, anything for a good picture!!

Make sure you don't miss out on the next article - Register to the RSS feed or the newsletter.

Comments

I'm glad my tutorial got

I'm glad my tutorial got extra exposure with the help of DIY photography! I'm planning to post more photos made using this light-table shortly on my photoblog(http://daily.felixmenard.com/).

I Hope you're now all convinced to finally build yourself the light-table you wanted for so long. Good luck!

LCD Monitor

Just seen this. As an IT manager I have a lot of duff flat screens, so just tried it on a knackered Samsung SyncMaster 913n - and guess what - it only works!!!!

Brilliant idea!! Many thanks. We can really use some at work too!!

Think I'll get a thin perspex or tempered glass sheet to replace the tft panel though to protect the back-light.

...AND

If you then trim all the connectors and gubbins (technical IT term) hanging off the edge of the tft panel, then with the smooth shiny side up, tape up the edges for safety you have a very nice dark shiny surface for shooting against and getting nice reflections off that's a bit different. No waste. Eco-friendly. You get 2 new toys. Everyone's happy.

re: LCD

Aha! the IT and photog connection again. The more I post, the more I see that IT scraps can be reused for photography stuff. It was the same thing with the TTL extender.

FJ, if you have some photos of the process, I'd be grateful if you could share the process of this conversion. I think (non IT) photogs will be interested. Ping me via the comments/contact form if you'd like to post a tutorial on this.

TFT Light Table

Yup - no problem. Got another one to do tomorrow, so will record it. And if you look at my new uploads - you can see it in action! Along with my other new DIY project - Verticle Camera Mount made from a mono Gnome enlarger I've had since 1981!

http://www.flickr.com/photos/39260749@N04/3638817141/

I'm getting the bug for this DIY stuff! Just ordered 2 mylar blankets - £1 each! £5 or £6 in the camping shops!

Oops - sorry Link broken!

Oops - sorry Link broken! Here it is...

http://www.flickr.com/photos/39260749@N04/3638885181/

Old LCD monitor for a light table

Many times the LCD part of a monitor will either go out or develop bad spots and is no longer considered usable. If that happens, the back light is still good and it consists of two fluorescent lights. Disassemble the monitor, removed the LCD screen, and put it all back together for a portable light table. I have done this with a 17" monitor from my office and it works well especially since it was free.

Re: Old LCD monitor for a light table

Good idea.
How did you get the lamps to stay on?
My monitor shuts them off after a few minutes if it does not receive a video signal.

Re: Old LCD monitor for a light table

@Zaug - Mine stays on (Dell E172EPt) but I don't know if it worked that way before it was disassembled. Fluorescent lights don't last long if they're power cycled frequently so I wonder if they are on all the time. I believe LCDs go black when they're not powered so you don't really know if the back light is on or not. That doesn't really answer your question but, if you have a bad monitor, you have nothing to lose by trying.

@udijw - I did this over a year ago and didn't take any pictures. We had a busted monitor and someone said "Hey, what's inside those things anyway..." After the parts were scattered about the office, someone asked about using it as a light table so we put it back together to see. Here's what it looks like now:
http://www.flickr.com/photos/jaster131/sets/72157619791512549/

And to answer what's inside... There's the obvious power supply, circuit boards, etc. The lights are really small fluorescent tubes top & bottom which are mounted in clear tube (shatter protection?) then in a metal reflector. There's a clear plastic piece about 1/4" thick which the light is directed into. Then there was 3 or 4 layers of white-ish plastic film which creates the white surface instead of it looking like a light bulb.

re: LCD monitor

Funny, I could have sworn that it was just a monitor ;)

RE: LCD monitor

It was... ;) Dead monitors are usually free so this saves the cost of buying lights and such. In my case, it's easy to stash away until I need it and it's portable. Mounting it permanently to a desk wouldn't be hard if that fits your needs.

I forgot to address the color issue in your first post. What I did was remove the LCD part of the display so there is no longer any option of color. The only functional part of the screen that's left is the back light.

Great idea, inexpensive

Great idea, inexpensive also. If you want to step up a little, go to a glass shop and ask for a used shower door. Get a used one, they normally are free. They are made from tempered glass and if they break, they shatter into little shards so you don't get cut. Turn the glass so the textured side is down. You can use 4 to 6 florescent tubes, great light! Mine has switches on each light, so I can control the amount of light. I didn't use the silver paint or tinfoil, great idea, I'll add that this weekend.

re: light table

@Felix - thank you so much for sharing this tutorial. I'm looking forward to see the transparent pics.

@Jason - Thanks for the monitor idea. Sounds like a nice way to get great even light. It is a nice bonus that you can also control the color. I'd love it if you could share some pics.

@Bobby - Thanks for the thrifty ideas. 6 lights should provide ample lighting for continuous softbox lighting. Got any images to share? I bet everyone would love to see the final results.

Thanks for this easy DiY.

Thanks for this easy DiY. Really, the results using light from behind are spectacular.
An even easier way to do that is a simple box with a flash unit inside, then a plastic (I used plastic folders for keeping documents) and the object to photograph on it. the onboard flash will trigger the one inside the box.
I used blue semitransparent plastic just experimenting. (see results here:
http://www.flickr.com/photos/ana_gr/3434749159/in/photostream/ and http://www.flickr.com/photos/ana_gr/3435552330/in/photostream/

re: flash

Hi Ana,

Using flash is definitely a great option, especially if you already have a flash. If the flash is not diffused / reflected the effect is a bit different from the one of a light table. It gives a hotspot in the middle of the table and falls off from there. this is a artistic choice. One shold just keep the differences in mind

Lighttable - Softbox

Hi,

anyone tried to use a softbox (tilted upwards) for shoot through lighting e.g. like the leaf in this article???

martin

Backlighting

I did a similar thing a a while back but on a smaller scale.

All it cost me was a tub of yoghurt and some tape and kitchen paper which I already had - backlighting on a budget

AHA

Now I know what to do with that 40yr old sewing machine cabinet that my mother left me. LOL. Has a top that flips over to double the size..gonna cut a hole in that and put lights in where the sewing machine went...perfect...why didn't I think of that sooner. :) Going to spray it flat black as well. :)

Great ideas everyone

This one is on the to-do list too. I really dig the repurposed flat screen monitor idea though, and the final product look amazing.

In a pinch I have used a translucent cutting board over a bowl containing my flash, with some wadded paper for more diffusing and less of a hot spot issue. It worked well, in a pinch. Certainly better to have something like this though.

I did basically the same

I did basically the same thing, but used an old (dead) scanner.. Just ripped out the guts, and inserted a cheap fluorescent lamp..

It's funny when someone walks in my "office" and wants me to scan something for them

Post new comment

The content of this field is kept private and will not be shown publicly.
  • Allowed HTML tags: <a> <em> <strong> <cite> <code> <ul> <ol> <li> <dl> <dt> <dd> <img> <a>
  • Lines and paragraphs break automatically.
  • Web page addresses and e-mail addresses turn into links automatically.

More information about formatting options