


Photoshop’s AI Assistant Now in Beta: It Edits Your Photos or Teaches You How
Mar 10, 2026
Dunja Đuđić
Dunja Djudjic is a multi-talented artist based in Novi Sad, Serbia. With 15 years of experience as a photographer, she specializes in capturing the beauty of nature, travel, concerts, and fine art. In addition to her photography, Dunja also expresses her creativity through writing, embroidery, and jewelry making.
Share:
Photoshop just got a feature that might change how you edit photos, or help you if you’re just starting out. Originally introduced at Adobe MAX 2025, Photoshop’s AI Assistant lets you modify images simply by describing the changes you want. Instead of digging through menus and tools, you can now tell Photoshop what you want to happen in your image. From there, you have two choices: the software either performs the edit automatically or guides you through the steps so you can do it yourself.
Edit Photos Just by Describing the Change
The idea behind the AI Assistant is pretty straightforward. You type or speak a prompt describing the edit you want.
For example, you could ask Photoshop to remove distractions from a photo, adjust lighting, change colors, or replace a background. The assistant can either apply the edit immediately or walk you through the process step by step so you learn how it works. Personally, I prefer the latter approach. It could help learning a new editing trick without searching for the perfect YouTube tutorial.
On mobile, you can even use voice commands to request edits. This could be useful for those quick edits before you post your work on social media or send it to someone.
For photographers, all of this makes routine edits much faster. Removing a tourist from your travel shot or cleaning up a distracting object in a portrait could take seconds instead of minutes.


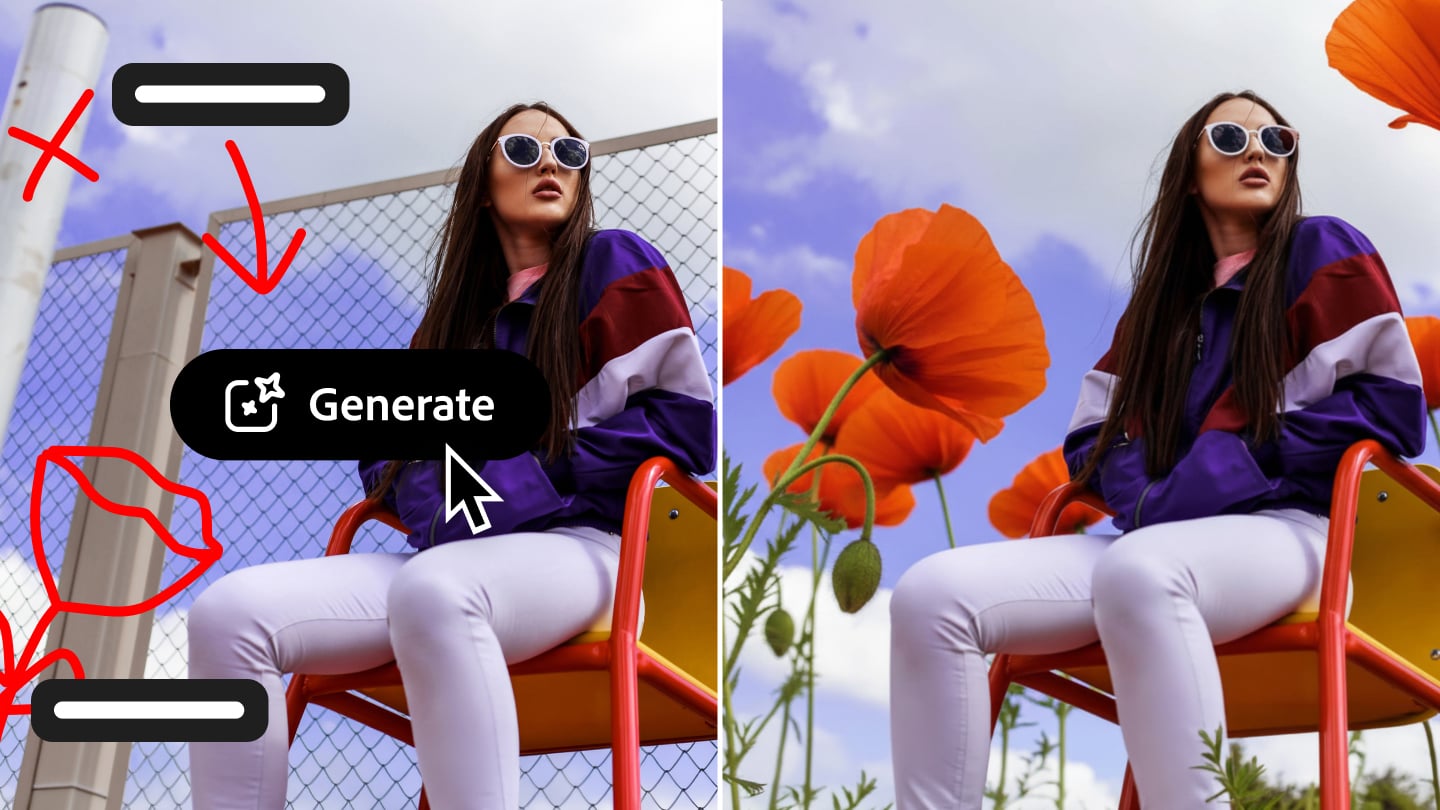
Draw Where the AI Should Edit
Photoshop’s web version also adds something called AI Markup. It lets you draw directly on the photo to mark the area you want to change. Then you type a prompt describing the edit. For example, you could circle a section of the sky and ask Photoshop to replace it, or highlight part of a scene and ask it to add flowers or mountains. The AI then generates changes only inside the area you marked.
This approach gives you a bit more control if you use AI to alter your images. Note, however, that this still leaves the realm of photography and dives into generative AI waters.
Firefly Adds More AI Editing Tools
Adobe also expanded its Firefly Image Editor with a range of generative tools designed for both AI-generated and real images.
These tools include Generative Fill, Generative Remove, Generative Expand, Generative Upscale, and background removal. In practical terms, that means you can add or remove objects, extend the edges of a photo to fit a new aspect ratio, improve resolution, or isolate a subject with a single click.

Firefly also supports more than 25 AI models, including Adobe’s own models and others from companies like OpenAI, Runway, and Black Forest Labs.
Adobe Firefly’s new image editing capabilities are available globally today in the Firefly Image Editor, and Firefly customers can currently access unlimited generations. As for the AI Assistant, it’s now available in public beta for Photoshop on web and mobile.

Dunja Đuđić
Dunja Djudjic is a multi-talented artist based in Novi Sad, Serbia. With 15 years of experience as a photographer, she specializes in capturing the beauty of nature, travel, concerts, and fine art. In addition to her photography, Dunja also expresses her creativity through writing, embroidery, and jewelry making.
Related Posts
 A man photoshops himself into his childhood photos, and the result is mind-blowing
 What it looks like when a Photoshop pro teaches mom to edit photos
 Photographer photoshops bride without her knowledge to make her look skinnier, claims that he deleted original photos
 Mother ‘Horrified’ After Studio Photoshops Daughter’s Birthmark
Join the Discussion
DIYP Comment Policy
Be nice, be on-topic, no personal information or flames.