Recent Posts | Share a Tip | Back to Basics | Reader Photos | Forum | Subscribe
Home Studio | Tutorials | Readers Projects
If you are a photographer and using flash (either for studio pictures or for outdoor shooting), you are probably aware of the problems that a hot-shoe flash introduces: the shadows of an object are crisp-sharp, creating an artificial look to the object. When dealing with studio lighting, you can use a softbox to diffuse your shadows and this is an acceptable solution, but for the amateur photographer it does have some disadvantages:
1. A softbox is very expensive. A simple softbox like this softbox from Arri, can cost several hundreds of dollars. (See our big DIY softbox version)
2. A softbox is big, and can not be carried around.
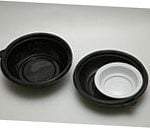
The amateur photographer can compromise and us a flash mounted softbox like this softbox from Lumiquest, or a stoffen box. The problem with this one (although a minor one compared to the "big" Softboxes), is the cost, nearing 30 dollars. Well, I guess that for some 30 bucks is no big deal (and especially no big deal for photography equipment), but I am going to try and do even better.
In the following tutorial, I will demonstrate how to make your own flash mounted, homemade softbox (view results).
You will need two good hands, and some patience, but your reward will be a nice softbox for the cost of only 3-4 dollars. (Not to mention that wonderful feeling of cutting and gluing, like you are small kids again).
you might also want to check out the DIY Mini Flash Bouncer Guide or the DIY Mini Flash Diffuser Guide as alternate diffusing solutions.
1. Download the softbox scheme found here (© 2006 Udi Tirosh. OK to print for personal, non-commercial use).
if you are having trouble printing this on multiple pages, you can use this file in microsoft's mdi format. it will print multiple A4 pages. (and here is one for letter pages)
2. Print the scheme at its original size (should take about 6 A4 pages - three wide and two long). good old mspaint (the crappy painter that comes with windows) can do the job.
3. Glue the sheets of paper together. (You can use the circles as place keepers between the sheets). You know you had it right if the 5cm mark on the paper actually is 5cm. You should end up with something like this.
(I used a material called MAPAL, it's kind of a plastic cardboard, so I used masking tape, but if you use cardboard I'd place it with paper clips). You can see how it looks like here
4. Flip the cardboard and go over the lines. When you are done you can remove the scheme
5. Cut at the outer lines, you should get something like a star. Then remove the inner square (it should look like an old TV set).
6. Now glue the Velcro over the "star" edges to form a closable box.
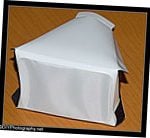
7. Glue the silk sheet over the TV set. This is what you'll get:
8. When you fold it, and attach the velcroes, it should look like this:

9. Great, you are done.
Here is a test I made with (upper) and with out (lower) the Flash Mounted Softbox. You can see that the light is harsher on the bare flash. (Both pictures taken with Nikon D70, at ISO400 with an f/8 s=1/200 with the Nikkor 28-105 lens at 105 mm, and my good old SB-28). I used the background from the cheap home-studio setup.
If you have used the DIY Light Tent in this article, please post a comment with a link to your structure / photos - show off!
Make sure you don't miss out on the next article - Register to the RSS feed or the newsletter.
More Cool Lighting:
- Homemade Gridspot
- Just Fab's Turkey Pan Beauty Dish
- DIY Wax-Fen Flash Diffuser - Yet Another Bouncy Thingy
- Getting Fired by My Daughter
- The Party Bouncer is Back in Business (Card)
- The Ghetto Studio
make money by selling your photos
Comments
Improvements and modifications
I got this in the mail from Arnon Tsairi, and looks like there are some nice improvements and modifications to the softbox:
Several modifications: I used a sticky 3M Scotch. The result is clean, but I hope the glue will last.
Colored the interior with silvery spray, to reduce light loss through the sides. As the MAPAL is translucent, I did not cut the front at all.
It works, although I did not make a real comparison to a silky front. I left the ends that wrap around the flash longer than in the drawing and folded the in. I then used a rubber band to fasten the softbox around the flash. I think this way the assembly is more firm. Four A4 sheets are enough for the drawing, if you arrange them as a cross. I cropped the image with some overlap between parts, so matching the parts was easy. I actually suggest that you will cut the image to four different files. It will make the life of users easier
And last line: I not only think the result is good, I really enjoyed making your softbox! Thanks!
yea dude im just going to dl
yea dude im just going to dl the templet and not cut out the middle.
Where can I buy MAPAL?
This maybe a dumb question. Where can I buy MAPAL?
It mentions office depot up, but I thought that is for card board.
Can I find MAPAL in office depot? If not where else can I buy it?
Thanks!
Hi MAPAL is just a local brand
what you should probably ask for is "polypropylene sheet". the stand of those is usually near the card board stand.
Mapal's other names and where to find it
Mapal also sells by the name Corroplast. It is just like corrugated cardboard, only plastic.
You can find it in graphic arts stores (and some hardware stores). It is often used for temporary signs.
Works GREAT !
I gave it a shot.......what the heck, it was cheap enuff....had all the items at the house....It works GREAT , and looks great....pics look very pro.
thanks for the tips, and I'll be sure to pass this web site along to some friends....
Another version
We made a similar project when I was in photography classes. We used foam core boards (white). Bascially you cut two pairs of pieces out of the foam core. Decide how large you want the front square to be. Then measure the width (outside) of your flash and then angle out to the front dimensions. To make up some numbers it might go like this. The flash is 2.5 inches, you want the front to 6 inches on each side, and the box about 4 inches deep. Draw a six inch line, measure back 4 inches, and then center your 2.5 inch line in relation to the 6 inch line (was that clear or what!). Draw and angled line from the 6 inch line to the 2.5 inch line. Now cut it out and make another just like it. Repeat the process for the side dimension of the flash and make two of those pieces.
When you fit the pieces together, you should have a rectangular opening in the "back" for your flash head and a nice big square in the "front." Glue the pieces together like that (this is the tricky part :) )
After the glue is dry get a piece of your favorite diffuser material (we used tracing paper). Run a bead of glue around the front edge of the square opening and lay it down on the diffuser paper. After the glue dries, trim it to fit.
If you measured and cut right, it should fit perfectly on your flash head and you can just slide it on. For a bit more security you can clue a couple of strips of vecro "wool" on the diffuser and make a strap with the "hook" side that goes around your flash head.
The foam board is pretty light tight so you don't need to do anything to the interior of the diffuser.
Enjoy!
similar approach
I used a similar approach. For my SB-24 and SB-26 to fit I created 2 pairs of sidepieces. Smallest opening of box being 4x7,5cm and widest opening being 10x15cm. The depth I kept on 15cm. Cutting out these 4 pieces seperately and then taping them together is easier then the suggested template. As material I used some cover of a magazine. For the diffuse material in front I used scotch, kitchen paper. I'll probably paint the inside later as well for better reflection.
A sketch that is not on scale, sides are not equal so don't use this as a template! U can easily cut these out according to the measurements of your flash, that is for the smallest sides.
http://i312.photobucket.com/albums/ll323/cappelleh/20090106%20Alisa%20fl...
Printing
A tip for OSX users: Open the image in Preview, save as PDF and open the PDF in Illustrator. Turn on page tiling and in the Setup section of the Print dialog, for Tiling choose 'Tile Full Pages'. It printed full bleed on my HP 2610 all-in-one :)
LIGHTING
I am new to photography so bear with me.
How exactly do you use a soft box? Do you put a light inside of it? Or do you take the picture through it?
Softbox and Light Tent
Hi,
Welcome to the great world of lighting. if you are new to this, let me suggest a visit to strobist. He has great tutorials.
A softbox is a big hollow box you mount on your flash (or strobe). The softbox make the light source bigger, and produce a softer image.
A light tent is a big box with semitransparent sides. you can place an object inside that box and illuminate the sides of the box. This way you get a soft image with no reflections.
have fun,
Udi Tirosh
I do not understand the
I do not understand the transfer of the image from the six A4 pages to the cardboard or MAPAL sheet. I use a laser printer and images do not transfer by going over the lines. Did anybody have a similar problem? More importantly how can this be fixed except trying to redraw the image?
Something very essential
One thing!
What kind of light should I use? There's many different kind of lights and lights that get hot during photoshoots can be dangerous when near filters like this, usually made of paper or fabric; I don't know much, could someone explain what kind of lights are the best for these? Lights that don't get so hot. What do the professionals use anyway?
cold light
Hi Dear,
You should use cold light - AKA a hot shoe flash with this. So there is no burning risk
diffuser
hey, i havent tried your softbox yet but sounds like a whole lot of fun.
I was just wondering. do you use a diffuser on your flash or not?
my guess is not... just to make sure... hehe... thanks
Hi Mimin - you are correct
no diffuser.
Diffuser
Another great idea to go with this is to get on ebay and order a $3.00us credit card magnifyer and you have yourself a beamer for telephoto too. just put it in place of the diffusing material.
Printing Template
hi, I could not print out whole template, it came out only one sheet every time. Pls help me.
printing across multiple pages
Hi Smith,
Please check the files again. I have added some more formats that can easily be printed across multiple pages. (see this file)
Best regards,
Udi
Can't Print Either
I've also tried to print this and whatever that mdi file is....is not recognized by any program on my computer. MS paint doesn't work either. It printed it but it printed it on 4 pieces of paper instead of six. I'd really like to make this but can't get the template printed.
A photo of the softbox...
...mounted on the flash in an usual setup would be good, especially for beginners (like me). Thanks!
Old Flash...Softbox Modification Ideas?
I finally got this template downloaded and tried to redraw it with my parameters for my OLD OLD OLD SB-16 but it's not quite working the way I'd like it to. Does anyone have any ideas to make this template compatible with the older rectangular shaped flashes? I'm doing a wedding this weekend for the first time and the results from using one of these amazes me so I'd really love to be able to make one for my OLD OLD OLD :-) flash. I have four days 'til the wedding. Think I'm a bit of a procrastinator? :-) Any help would be SOOOOOO greatly appreciated.
Thanks in advance for anything you can offer.
Super idea
Thank YOU :)
You made my day, I just need this flash soft box : )
Bibi
I just recently purchase a
I just recently purchase a soft box and used it for the first time the other night. I was shooting a play and boy am I impressed with the results. Nice soft light on the actors, sharp and clean.
I'm going to try making the one you have here and I'll let you know how it worked out.
light in softbox
What kind of light did you use in your softbox? I ordered a softbox but it didnt come with a light.
This is a good idea, but I need to work some more at it.
This didn't turn out as well as I hoped. The dimensions didn't match my SB24 (not even close). And printing the pages out never worked: I got two sheets out of the four.
If someone could break the file into tiles (the poster above said he did his in Illustrator: if someone could do that and just save the Preview, that might work) it would help. I ended up just working backward from the dimensions of the SB24 and going from there.
Or you could simply lay out a quarter of the design and we could make four copies and tile them.
I wouldn't recommend Corroplast, as the internal flutes make it hard to manage sharp cuts and crisp folds. Foam core or some kind of thin art board makes more sense. Something a little heavier than poster board sounds about right.
And where do you find fabric stores that let you have silk for free? I paid US$10 for a 12 inch piece (44 inches wide as well). Tracing paper sounds like a good option.
Printing the template
Had trouble opening the .MDI file Here is a quick solution to configure MS office to read these files (the feature is not automaticly turned on when you install office): http://support.microsoft.com/kb/926198
Another Thought
I am a great believer in the wonder that is velcro. The last time I had home-made softboxes around I got sick of the space they took up (had a big one and a little one, after I liked the results of the little one I made). If you buy a roll of velcro you actually make a box that will flatten.
My boxes used foamcore, as one of the contributors above did. Any and all of the joints involved can be velcroed. If you want them to stay together, they stay together. If you want to separate them, you can detach the velcro strips, partially or completely. All velcro was krazy-glued.
I lined the inner joints of the box with 3-4" strips of white bristol board, glued to one side of the joint, but not the other. When you flatten the box two of the joints must fold, but they hold up for quite a while. This took care of light leakage.
AND, if you have a strong enough flash gun, you can throw an extra piece of lightweight fabric or tissue in the box, right in front of the flash and get an even softer diffusion of the light.
Used velcro to hold the box onto the flash. Especially with the big one I always stuck a stand under it anyhow, cuz it was too big and awkward for the flashgun to bear alone. The advantage of attaching the flash head to the box using velcro is that you can make a nice tight fit.
If I wanted to shoot from overhead it was tricky but it could be done. As I recall I ended up krazy-gluing an extra ledge of foamcore around the flashhead end of the softbox. I attached the softbox to the flash, then wrapped a bungie around the whole mess, using that ledge, and hooked it to the stand or boom, to help. I always had an extra stand around, though, to make sure things didn't fall apart on me.
Good old velcro . . .
D
Appreciated the article. For
Appreciated the article.
For those that maybe don't quite understand what this does (or where it goes), the only photo missing is showing that this attaches to the flash itself.
At first I thought it was a box that you put items into. A photo showing it's final resting place would be greatly beneficial for others skimming the photos.
It really works
I used this template on a smaller scale, made out of 80gsm white paper. This worked fantastically on my a Cybershot DSC-650. I stuck it down over the built in flash, just missing the lens. Worked brilliantly. Thanks for the tutorial.
ERRRGH - I can't find MAPAL,
ERRRGH - I can't find MAPAL, or polypropylene any where. I found poyester drafting paper but nothing cheap or that size.
Can anyone make a suggestion I live in Southern California.
Thank you
Jake
BTW
Great Work
instead of mapal
I just used poster board. one large sheet
Polypropoline Replacement
If you can't find polypropoline there is always polyvinylchloride ie. white vinyl shower curtains. Any dollar store has them for a dollar. They work perfectly. Maybe not as nice as the polypropoline but quality of light wise it's the same.
Underexposed photos
Friends, i`ve made this softbox and it`s good!
It works wonderful at 18-40 mm, but when I switch to 55 mm - pictures becomes hightly underexposed.. I think that is because of very wide angle of the softbox=(
What can you recommend to do in this situation?
MDI File printer and viewer
Those of you with Office XP and earlier will not be able to add Microsoft Document Imaging as recommended in the article posted here earlier.
Instead, you can obtain a free utility MDI2PDF which accidentally will also print and view MDI files.
Utility can be found here: http://www.hot.ee/mdiviewer/
Comments and suggestions
Thank you for the great article. It certainly gives a lot of ideas.
While one does not necessarily have to follow this exactly, this is one brilliant softbox. My softbox broke just now unfortunately, due to the fact that I misjudged my strength and bent top and bottom too strong.
Personally, I would live sides as wide as top and bottom thus making the box slightly larger and perhaps allowing more space around the front opening.
Additionally, there should be thinner sheets of polypropelene available, which can easily replace the silk used to cover the front in this example.
I am now toying with few ideas for a "mod" of this particular softbox and will try to post the follow up when it is ready.
I wonder if you could use something like vellum?
Interesting....thanks for the inspiration. I'll probably play around with this. I'm thinking white vellum might work beyond 55mm. It's available in various colors, but is opaque...I recently searched for white vellum at the local craft store, but found it much cheaper at Staples. 50 sheets for around $10 in case anyone else wants to try it.
Best,
KJ
Sounds like a great options, Matt
I'd love it if you shared the results.
Malpals north american cousin.
I have worked in plastics for years and mal pal is also known as MYLAR in north america, it's plastic and comes in a variety of thicknesses as well as opaque to translucent. it's the same material they use to make paint stencils at the craft stores. If you have a plastic dealer in your town you can purchase it in 4' x 8' sheets and it's very inexpensive.
Foil or not?
Awesome.. I was in the market for a softbox, and thought I would give this a try before spending the bucks.. Made 2 tonight. Office depot didn't have Mapal, so I used poster board.. one is plain with the frabric front, the other, I lined the sides with foil (shiny side up) and a fabric front.. which one is better?
Thanks..
re: Foil or not?
Hi Neil,
That is an interesting question, an d depends on the type of poster board you used. Nick did some tests with different linings that can set you on the right direction.
I'd love to see the test results from both and hear your decision.
I have a question.
You all seem to be experts, and I was wondering if you could give me a few tips on making a DIY Photography Studio. I read the article on it but it didn't help much. I am trying to make on in my room to put portraits of people, and I have had a few requests on products but the portraits are more important.
What is the importance of white paper on the floor [Besides just having the white paper on the wall].
What is the best type of lighting to use, for cheap?
etc etc. Any help would be great! thanks!
heres something that I've
heres something that I've came up with if anyone is looking for a DIY yourself diffuser for an external flash. you can download the schematic from my website.
http://yello77.com/?p=1078
Softbox / Bounce
I was reqested to shoot a model outdoors in the evening, around her neighborhood. In this scenario, we can not walk around with our ights and extensions cords. having sufficient light to get rid of the shadows om my subject had proven difficult.
Because I dont like to use a flash, we were limited to bouncing the light form nearby street lamps and floodlights from local buildings.
In the areas where the artificial light was sufficient, we prodced decent results. However, it happend to be that the spots I truly wanted to use as a backdrop did not have the light required to be successful.
I would like to know if anyone has applied this portable soft box to a maglite flashlight? Or does anyone have a suggestion for a maglite bounce device available? Other than holding the flashlight in one hand and the bounce in another. I was thinking of mounting my maglite to a bounce umrella?
Thank you,
Frank
If you're having trouble
If you're having trouble printing, this download PosteRazor, which is a program that will turn it into a PDF containing several pages that you can print on any printer.
http://posterazor.sourceforge.net/
Just Goes To Show
After reading through this I am amazed at the cost saving efforts we will all go to in order to get the improvement in our shots that we want. I am fortunate enough that I don't have to go the DIY course for my softbox but I want to pass on my utmost "way to go" to all of you that have taken the time to improve your shots with this basic and low cost addition to your picture arsenal. What would we do without this kind of information being shared.
nice idea
thanks for the tips, great idea, I also use a lot of bounced lighting - wall for example although you are limited to colors.
Very cool!
I've started to take more and more ring shots and sometimes I use flash to add a little kick. This contraption should result in softer light so I can shoot directly and at a lower power than bouncing. Great tip! Thank you!
Post new comment