


Ghetto Magic Arm From An Old Golf Club
Aug 26, 2010
Udi Tirosh
Udi Tirosh is an entrepreneur, photography inventor, journalist, educator, and writer based in Israel. With over 25 years of experience in the photo-video industry, Udi has built and sold several photography-related brands. Udi has a double degree in mass media communications and computer science.
Share:
 Photographer David Martinez thought that $110 is a bit too much for a magic arm. He came up with his own version for half the price. It’s all David from here.
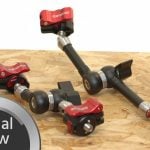
Over the years I have found a few broken clubs laying near tee boxes on golf courses. Graphite shafts are usually very stiff and I always thought they might be repurposed. So I have collected a few of them. Well it just happened that I was in thinking about buying a Magic Arm recently. A friend had one and it was pretty sweet but the price was kinda crazy.

The light bulb went off and I began to formulate a plan to make my own magic arm out of one of these found graphite shafts. I went to a local camera shop and found the Giottos mini-ball head. It is a nice small, all metal mount. So I bought 3 for less than 30 bucks. I also picked up a metal strobomount. Next stop was the hardware store where I picked up a few nuts and bolts, some heavy duty epoxy, and a nice beefy clamp. A few glasses of wine and couple of hours later I had made my Ghetto Magic Arm.

The whole assembly is pretty sturdy. I used a clamp that is made of plastic with a very wide mouth. The clamp had to be drilled out slightly to accommodate the 3/8 – 16 threaded bolt. This particular clamp also has a hole fortuitously placed on the opposite end that a 1/4 – 20 bolts fits in nicely. I placed a wing bolt here.

This can be used to attach practically anything else; I have added another stroboframe. The shaft was cut in two pieces with a hack saw keeping in mind the inner diameter would need to be large enough to hold the glued pieces. To maintain stability I tried to keep the lengths to less than a foot for each piece. After that… it all went together super quick.

Total cost was about 55 dollars. I could have gone with cheaper pieces but I am attaching some pretty expensive flashes to it. The graphite shaft was free but you can buy a sacrificial used club for dirt cheap at a pro-shop or used sporting goods store. I have used it quite a bit since it was made and it is very useful. I can clamp it to just about anything from a table top, door, passenger window of a car (some pretty cool outside the car shots), or a 4×4.
It holds about 4 pounds which is all I really need for flashes, my PS camera, flags, gobos, etc. It can easily be broken down into two separate pieces and each piece can be attached to anything with standard 1/4 or 3/8 bolts. I wouldn’t put my heavy 7D on it but that’s about the only limitation I’ve found.
got any other cool hack. Let us know via the comments.

Udi Tirosh
Udi Tirosh is an entrepreneur, photography inventor, journalist, educator, and writer based in Israel. With over 25 years of experience in the photo-video industry, Udi has built and sold several photography-related brands. Udi has a double degree in mass media communications and computer science.


Join the Discussion
DIYP Comment Policy
Be nice, be on-topic, no personal information or flames.
One response to “Ghetto Magic Arm From An Old Golf Club”
Useful article, it’s informative.