


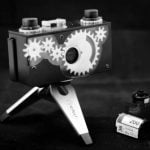
Build A 35mm Panoramic Pinhole Camera
May 23, 2011
Udi Tirosh
Udi Tirosh is an entrepreneur, photography inventor, journalist, educator, and writer based in Israel. With over 25 years of experience in the photo-video industry, Udi has built and sold several photography-related brands. Udi has a double degree in mass media communications and computer science.
Share:
 If you are still shooting film and are still in love with the magic of pinhole cameras, I have no doubt that you are going to fall head over feet for this next tutorial. You could always buy a model, but nothing gets a good old-days thrill like building a pinhole camera yourself.
It shows how to build a panoramic pinhole. You see, one of the things with small pinholes is that the focus plane is not constant, the film is “closer” to the lens at the center and farthest at the edges.
The panoramic pinhole camera takes care of that issue, while providing stunning panoramic images.
The guide below, while very detailed is not a 100% step by step, it is more of a specific guidelines on how to build your own. Feel free to experiment with and adapt the design
Materials
- 3mm thick stock board for construction of the box
- 1mm thick stock board for construction of the arch
- Popsicle sticks for the shutter mechanism
- Colorful plastic sheets for happy exterior finishing
- A can of Coke Zero (or Mountain Dew if you happen to be a strobist) for the pinhole
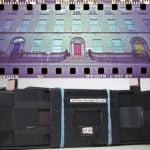
Step 1 – Creating The Template
First, use the sketch below to draw the parts on a 3mm stock card. Draw them in real size so you can actually cut them and glue them together to create the final camera. (Click to enlarge)

- The top diagram is a drawing for the bottom of the box. It is an overhead view which shows how to lay out the different parts of the camera. The cross on the left marks the location of the film spool. As you can see the outer diameter is 13.2 X 4.5
- The top part of the box is identical to the bottom, but the spool is on the exact symmetrical side
- On the left hand side, you’ll find the pieces are used to make the two film-spool chambers inside the camera
- On the right there is the front panel, the back panel has the same dimensions but no hole.
- On bottom left there is the frame that bends and make the arch, this is the frame that create the panorama effect and also gives some tension to the film
- On bottom right, there is the dimensions of the arch
- The camera box “sides” are not drawn on the diagram, they are two rectangles 5.8×3.9 cm each
Step 2 – Preparing The Parts
Using a sharp knife cut each of the parts.
Go over all the parts with a black marker, this will help avoid any reflections of light coming in.
Using a drill cut a small hole on the right side of the top panel (and on the left side of the bottom panel). You will later use those holes for the film spool
Preparing the pinhole: The easiest way to make a the actual hole is to use a pin to make a very small hole in a piece of an aluminum can (like coca cola or pepsi), then sand it down. More info can be found on MatchBoxPinhole.
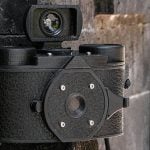
Step 3 – Construction

First build the outer box out of the exterior box parts. Use quick glue to attach all the parts and let them rest and dry for a bit
Then add the inner parts, the small flaps that keep the film container in place and the arc that produces the panoramic view.
Lastly, create the shutter mechanism, by using two popsicle sticks and a piece of cardbord. The mechanism is a simple card with a hole in one end that can slide from a close position to an open one.
Cover all the edges with light tight tape and then cover it all with fun colorful plastic sheet.
The camera loads with two cans of film – a new one and an old one. Again, a great place to learn about this technique is MathcBoxPinhole.

Tips
If you have your pinhole similar to the one I did, on bright sun light, and a film at rate 100iso, exposure is about 5 seconds. On a cloudy day about 10 to 15 and in lower light conditions allow for even longer exposure. It takes some experimenting to determine the exposure times… (Darn you digital era!)
This one is kinda crucial, the frames are not created with the standard 35mm size, so when you take the film to processing, make sure that they mark it so they will not auto cut it.
From some experimentation, the film chambers can be a little bit tighter, so feel free to experiment a bit
Sample Shots


About The Author
This camera was designed and built by Costas Kaounas a high school teacher and a photographer from Greece.

Udi Tirosh
Udi Tirosh is an entrepreneur, photography inventor, journalist, educator, and writer based in Israel. With over 25 years of experience in the photo-video industry, Udi has built and sold several photography-related brands. Udi has a double degree in mass media communications and computer science.

Join the Discussion
DIYP Comment Policy
Be nice, be on-topic, no personal information or flames.