


A Light Wall Of Light From Bed Sheets And PVC
Oct 25, 2011
Udi Tirosh
Udi Tirosh is an entrepreneur, photography inventor, journalist, educator, and writer based in Israel. With over 25 years of experience in the photo-video industry, Udi has built and sold several photography-related brands. Udi has a double degree in mass media communications and computer science.
Share:
 The Lastolite Hilite is a really neat, lightweight, and portable high-key background that can double as a softbox. Oh, did I forget to mention what a bargain it is? It’s not really – it is more than well outside of our reach. Still, I was intrigued by the simplicity of it and the many ways it could be used for still photography and video work. (Look here to see some nifty example videos of the Hilite and high key backgrounds.) I set out to make a DIY version and not break the bank in the process.
The first attempt was to suspend two flat white sheets that were safety pinned together around the periphery over a rectangular frame at the top. Two 45 Watt second slave strobes ($25/ea) were inside on light stands ($21/ea). I have no photos but it was leaning slightly on the positive side of the spectrum between abysmal failure to resounding success. It was at least successful enough to prove out the feasibility of the DIY concept…
Materials
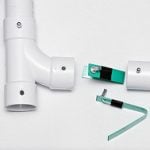
Let’s start with an explosion of the pieces to assemble the frame:

I used 1? thin walled PVC pipe because it was handy – it was left over from another project. Larger diameter pipe may be used but I would not recommend anything smaller. The frame requires two sets of the upper pieces for the frame top and bottom, and two sets of the lower pieces for the two sides. Here is the complete parts breakdown:
- 8 pieces of 1-3/4? long pipe
- 8 pieces of 35? long pipe
- 8 pieces of 8-3/8? long pipe
- 4 pieces of 34? long pipe
- 4 pieces of 36? long pipe
- 8 PVC 90-degree elbows
- 16 PVC Tees
The measurements above were arrived at after having cut them too long initially. Your mileage may vary, so if you decide to build, cut your pieces longer since you can always trim them. The PVC fitting openings were all 1? deep and the Tees were 3-3/8? long in the longest dimension. I point this out because not all fittings are created equal.
The pipe and fittings that are connected in the photo above were glued together after the final trimming to make the whole frame more rigid. The elbows butt up against the Tees using the 1-3/4? long pieces of pipe. Take care aligning the elbows and Tees so that they are square to each other. All the free ends of the pipe were sanded to make
them fit more easily into the mating fitting. Then the pipe ends were rubbed with a candle for lubrication to more easily permit breaking it down for transport. As shown in the photo, all the pieces, when stacked together, will be no longer than about 40-42 inches.
Assembly
When assembled as shown in the photo below, the whole thing measures about 81″ by 75″ by 12″, all to the outside edges. [Note that the photo is distorted because I used my 18-55mm kit lens at 18mm and did not correct for the distortion. The frame does not really bow like that in real life.]

Here is a close up of the upper right corner of the frame, showing the configuration of the fittings and joints in more detail:

And here’s a wider shot showing the center Tees:

Two 45 Watt second slave strobes are clamped ($14/ea) to the inside sides of the frame. Both point toward the back to diffuse the light by bouncing it off the back white sheet, spreading the light more evenly on the front sheet. Here is a close up of a strobe and clamp:

Three king size fitted sheets are then stretched over the frame in the following order: A white sheet (show draping down in the following photo) goes over the frame first and becomes the front face of the monster softbox. A white sheet is stretched over the first sheet and frame from the back side, followed by a black sheet over the back sheet. Covering the frame in this order allows the friction of the two outer sheets to keep the front sheet pulled taught. To do that, you have to reach inside the frame and pull the front sheet from behind the rear pipe while pulling on the two outer sheets from the outside. The outer black sheet is intended to prevent too much light from blowing out the back side of the monster softbox; it could be left off, depending on how it is used and what surrounds it.

The tautness of the front sheet might be improved by using elastic and safety pins or clips of some sort to pull opposite edges toward the center. I’ve not done this but may try it at some point.
Here is a photo of the fully assembled monster softbox. This exposure is 1/200 sec @ F9, ISO 400. The white area is completely blown out, which makes for a very nice high key background. [Ignore the light stands in the foreground – they were just there when I snapped this photo.]

High key backgrounds typically need to be 1 to 2 stops brighter than the subject in order to completely blow it out to white. With the fixed power strobes inside the monster softbox and similar ones inside the 2’x2′ softboxes I typically use to light subjects, I need to use source to subject distance to adjust the light ratio between subject and background. The two strobes inside may not necessarily be the optimum configuration, either, but they’ve been sufficient for the things we’ve used it for thus far.
The total project cost is hard to figure exactly but $45 of it came from the three fitted king size sheets from Walmart. I used sheets because they are relatively inexpensive large pieces of cloth with no seams in them. (Seams require extra Photoshop work to make them go away.) The PVC fittings probably account for another $20. I don’t usually count the strobes or clamps because I already had those on hand; they get moved around as needed.
Photos of the pieces and completed assembly are all well and good but what can it do and how well?
Below are some photos we’ve taken using the DIY monster softbox. Most of them use it as a high key background. The top two photos use it as a softbox with sheer curtains hung in front to make it look like a window. For the last two photos of two of my kids jumping, the monster soft box was raised off the floor by propping it up on two wood wine
boxes.
When the monster softbox raised, white paper or king size flat sheet can be hung in front and draped to the floor out in front and lit from the sides to make a infinite white background. As it is built to break down, the frame is not really rigid enough to mount on stands and tilt like one would do with a 4’x6′ softbox.
All in all, I consider the monster softbox a great success, especially since it cost about 1/10th the cost of the real Hilite and about 1/5th the cost of a 4’x6′ softbox…
[Note: I’ve written this up with regard to using it for still photography. Converting this for the constant lighting video requires will require some thought to be given as to how to provide that without burning down your house or studio. With the back sheets on it, tungsten lamps are certainly not usable. You have been informed and warned.]
Sample Shots


About The Author
David Dicarlo is a portrait and event photographer based in Austin, Texas. You can watch his work at Sunday’s Child Snapshots.

Udi Tirosh
Udi Tirosh is an entrepreneur, photography inventor, journalist, educator, and writer based in Israel. With over 25 years of experience in the photo-video industry, Udi has built and sold several photography-related brands. Udi has a double degree in mass media communications and computer science.


Join the Discussion
DIYP Comment Policy
Be nice, be on-topic, no personal information or flames.
3 responses to “A Light Wall Of Light From Bed Sheets And PVC”
I have a question for such an expert at accomplishing this awesome feat. If you covered the front of the frame with a black sheet instead of a white sheet, and poked holes in it, would it give off the effect of a starscape? I’m not a photographer, but admire your craftsmanship for a certain idea I have for my bands stage appearance. Please email me back at Fgrabosky@gmail.com Thanks! Or if anyone would like to answer this question for me on here, just leave a comment! Thank you!
Oh and I forgot to mention that I want the light to come out in rays from the pinholes…what kind of lighting would you recommend? I was thinking LEDs actually. Please help!
Just built this for my basement studio that has NO windows at all. It works great! The only change I made was to incorporate light sockets in an outdoor fixture and placed it where you had your clamp on fixtures. As I won’t be moving this out of the studio, a more permanent solution was just what it needed. Thank you for posting this. I am sharing it with a few other photographers who are in the same boat I am with window lighting.